Shopify bulk catalog setup from Excel with LinkyFlow
Shopify's current product model separates three things that used to be mixed together:
- product-level data
- product option structure
- sellable variants
That is why many imports fail on Shopify: the product exists, but the option names do not exist yet, so the variant payload has nothing valid to attach to.
This guide gives you a workflow that stays readable in Excel and matches how Shopify actually behaves today.
The short answer
For a new catalog import, the safest order is:
- Create the product with
productCreate. - Make sure the option names exist on the product before you create variants.
- Create the sellable variants with
productVariantsBulkCreate. - Keep
productSetfor later. It is another way to do the same job, and we will cover it in a dedicated next article.
The important Shopify rules are:
productCreatecan define product options and option values, but it creates only the initial variant.productOptionsCreateadds missing option names or starter values on an existing product.productVariantsBulkCreateneeds one value for every existing option on the product.- If the option already exists on the product,
productVariantsBulkCreatecan link an existing value by name or create a new value by name.
In this article, the recommended Excel workflow is still three sheets because it is easier to review, easier to troubleshoot, and better suited to merchandising and operations teams.
To keep the guide concrete, we stay on one story from beginning to end: you are launching a mug store and you want to create your first mug product with two color variants, Red and Green.
What you will get at the end
- A structured
Productssheet for product-level data. - A structured
ProductOptionssheet to seed option names on each product. - A structured
ProductVariantssheet to create sellable variants with price, SKU, and other variant data. - A repeatable import process you can reuse for future catalog launches.
Prerequisites
Before starting, make sure you have:
- A Shopify admin account with product permissions.
- LinkyFlow Shopify connection installed on Shopify: https://apps.shopify.com/shop-flow
- LinkyFlow add-in installed in Excel using the one-click flow:
- Shopify connection page (CTA): /products/shopflow
- Installation doc: /docs/shopflow-installation
Step 1 Build your workbook structure
Create one workbook with three sheets:
ProductsProductOptionsProductVariants
Why this structure works well:
Productsholds content, merchandising, and SEO fields that belong to the product itself.ProductOptionsis where you make Shopify aware of the option name used by the mug product, which in this guide isColor.ProductVariantsis where you create the actual sellable combinations with pricing, SKU, and inventory-related data.
Keep the workbook simple:
- One row in
Products= one product. - One row in
ProductOptions= one option seed row for one product. - One row in
ProductVariants= one sellable variant.
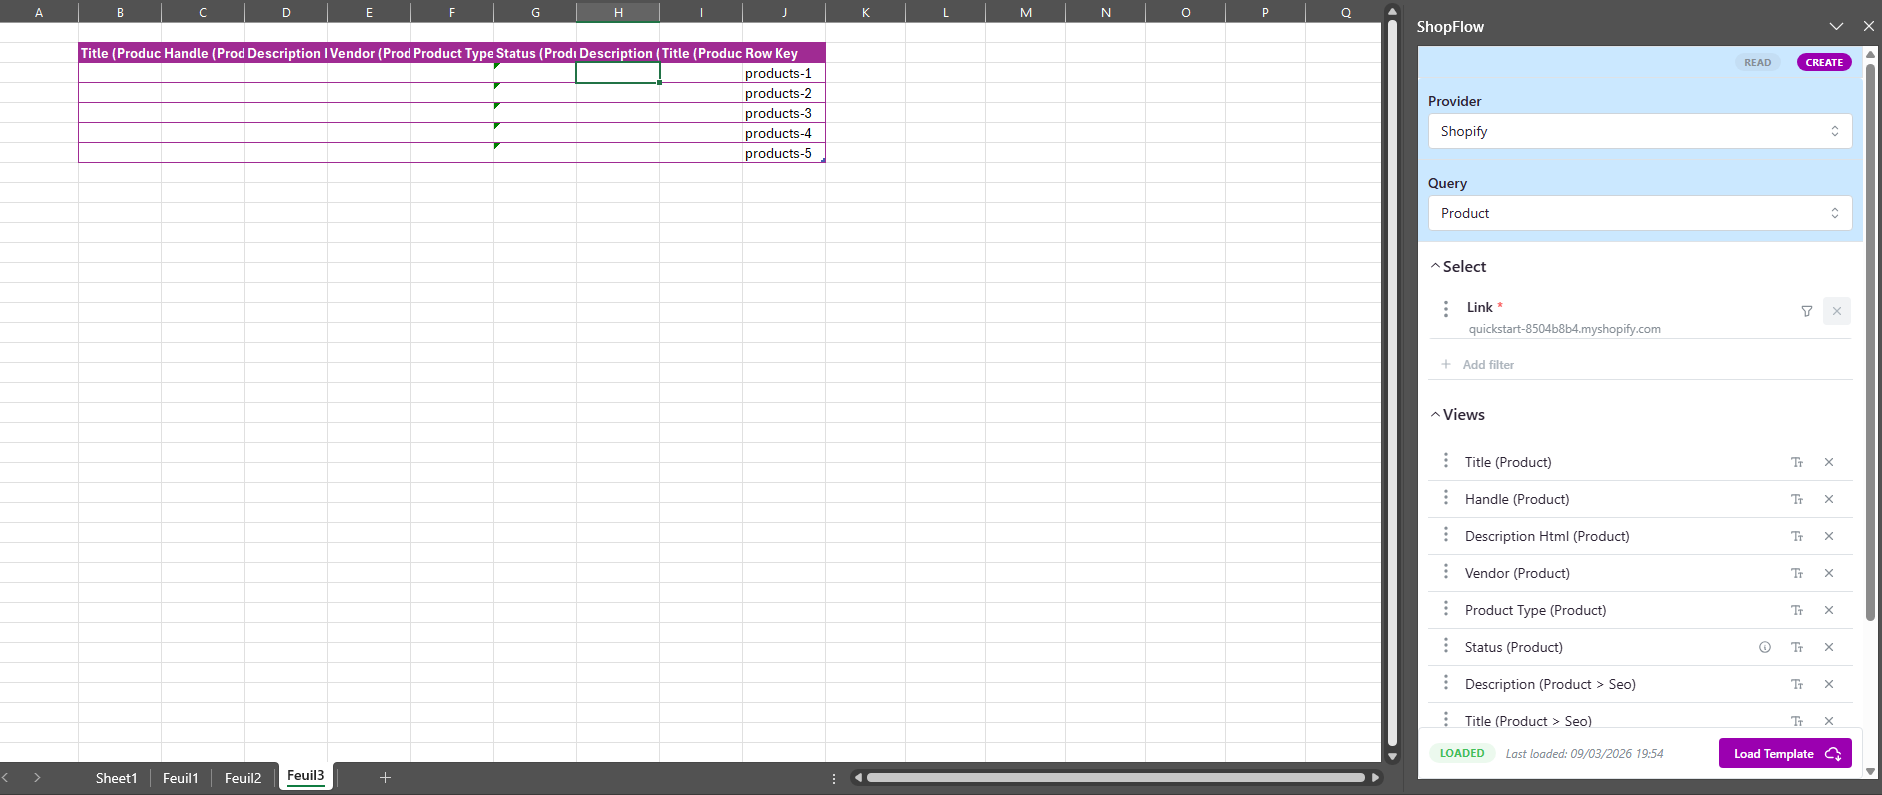
Step 2 Build the Products create template in LinkyFlow
In the LinkyFlow panel, switch from Read to Write.
Then select Create Product (productCreate).
Start with this baseline field set:
titlehandledescriptionHtmlvendorproductTypestatusSEO > TitleSEO > Description
Then click Load to generate the Excel input table.
Why these fields matter:
titleis the customer-facing product name and is also used by Shopify as a fallback when generating a handle.handlegives you a predictable URL slug. It is better to control it yourself than to let Shopify guess.descriptionHtmllets you keep product pages readable with basic formatting.vendorandproductTypemake filtering, reporting, and catalog cleanup easier later.statushelps you control catalog readiness in the admin.seo.titleandseo.descriptionimprove search snippet quality and keep your catalog launch more complete from day one.
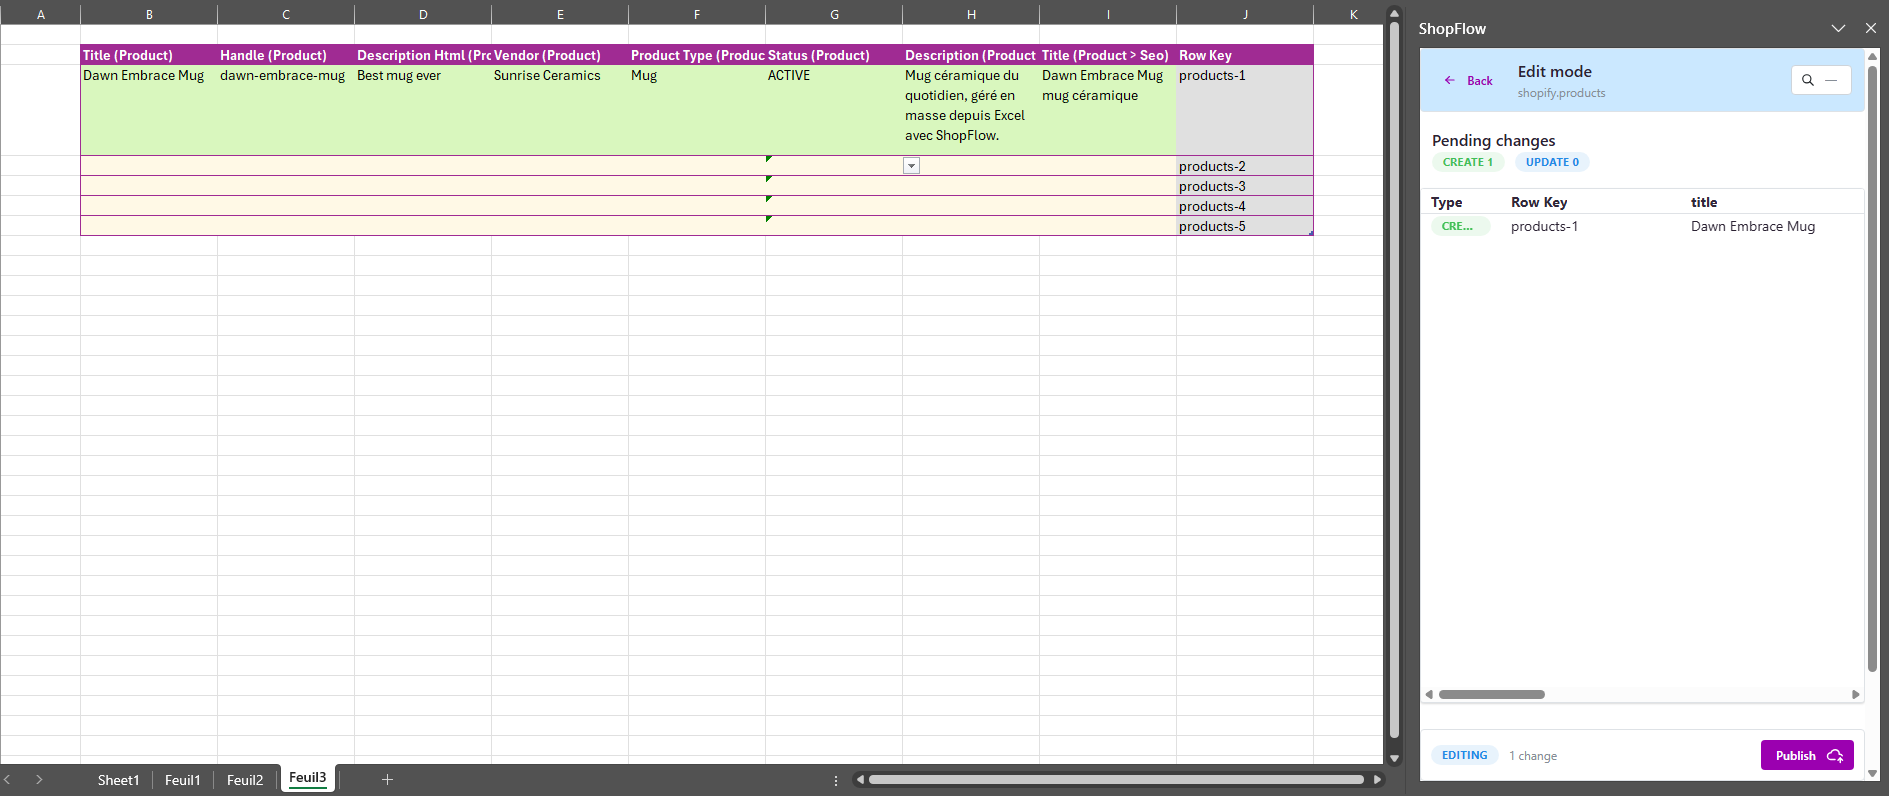
Step 3 Fill the Products sheet and run the create mutation
Fill each product row with complete and consistent information.
Example row:
title:Dawn Embrace Mughandle:dawn-embrace-mugdescriptionHtml: a clear product description with light HTML formattingvendor:Sunrise CeramicsproductType:Mugstatus:ACTIVESEO > Title:Dawn Embrace Mug ceramic coffee mugSEO > Description:Ceramic coffee mug for daily use. Bulk managed from Excel with LinkyFlow.
Click Publish in LinkyFlow to execute the mutation.
Important distinction:
- In LinkyFlow, Publish means “send the write request”.
- In Shopify, a product created with
productCreateis still unpublished from sales channels by default.
So this step creates the product record in Shopify, but it does not automatically make the product visible on your storefront.
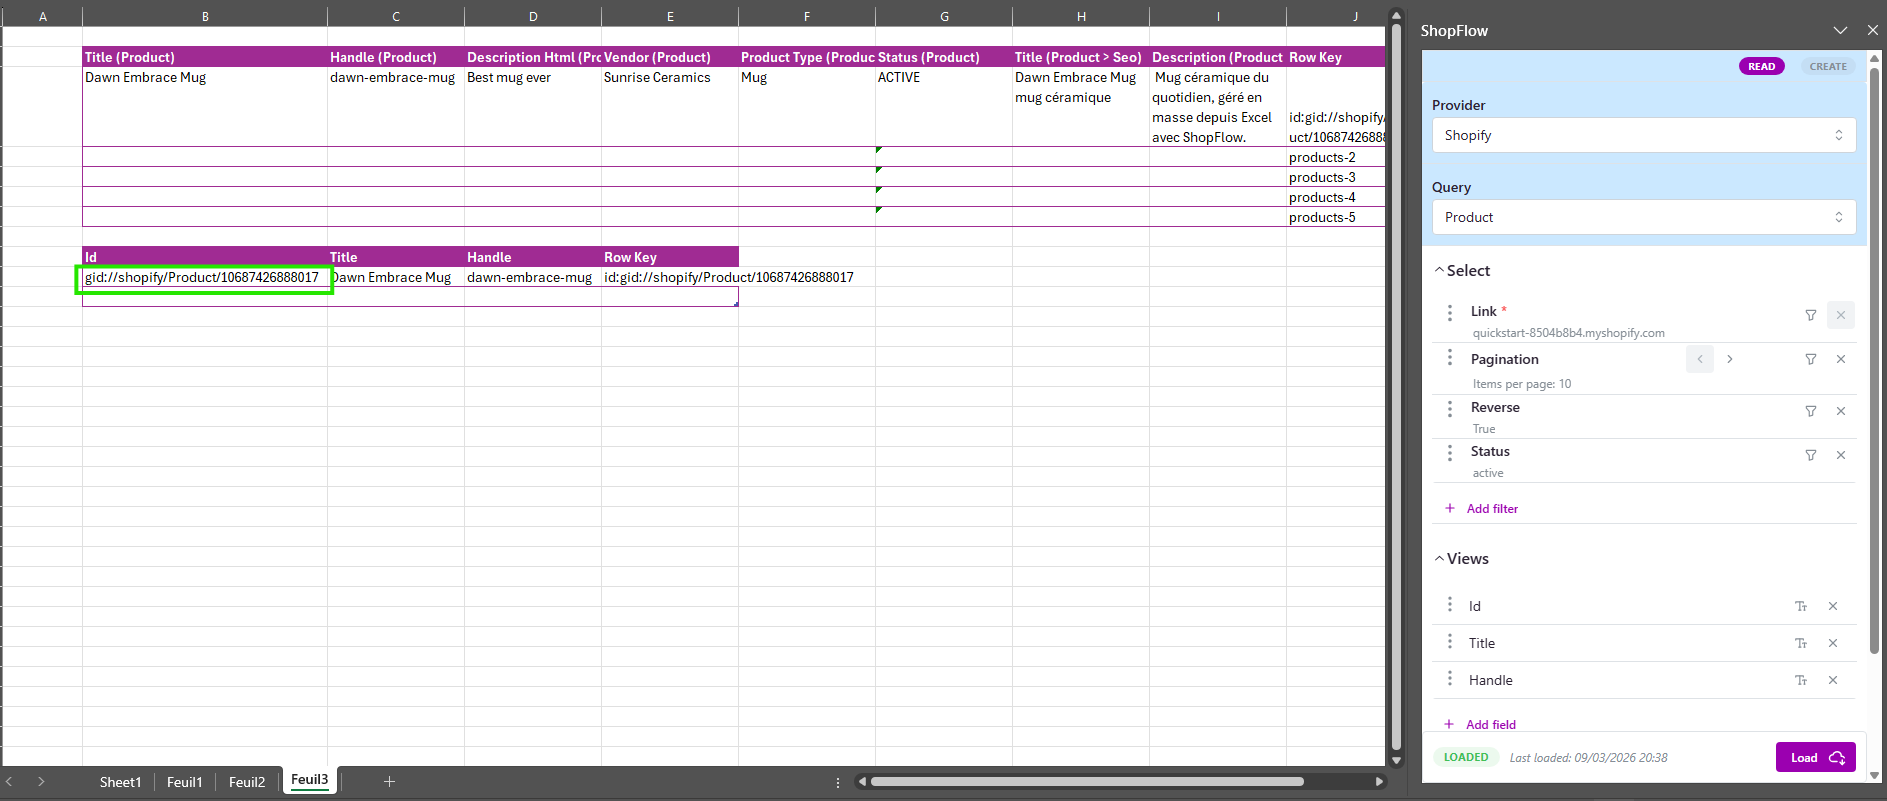
Step 4 Validate product creation and collect product IDs
After the write succeeds:
- Check LinkyFlow success notifications.
- Switch from Write back to Read if needed.
- Run a
productsread query and load at least:idtitlehandle
You will reuse id as productId in the option and variant steps.
Step 5 Create option names before variants
This is the part that usually causes confusion.
Shopify does not let productVariantsBulkCreate invent option names on a product that has none yet. In our mug example, the product must already know that it has one option called Color before a variant can reference Red or Green.
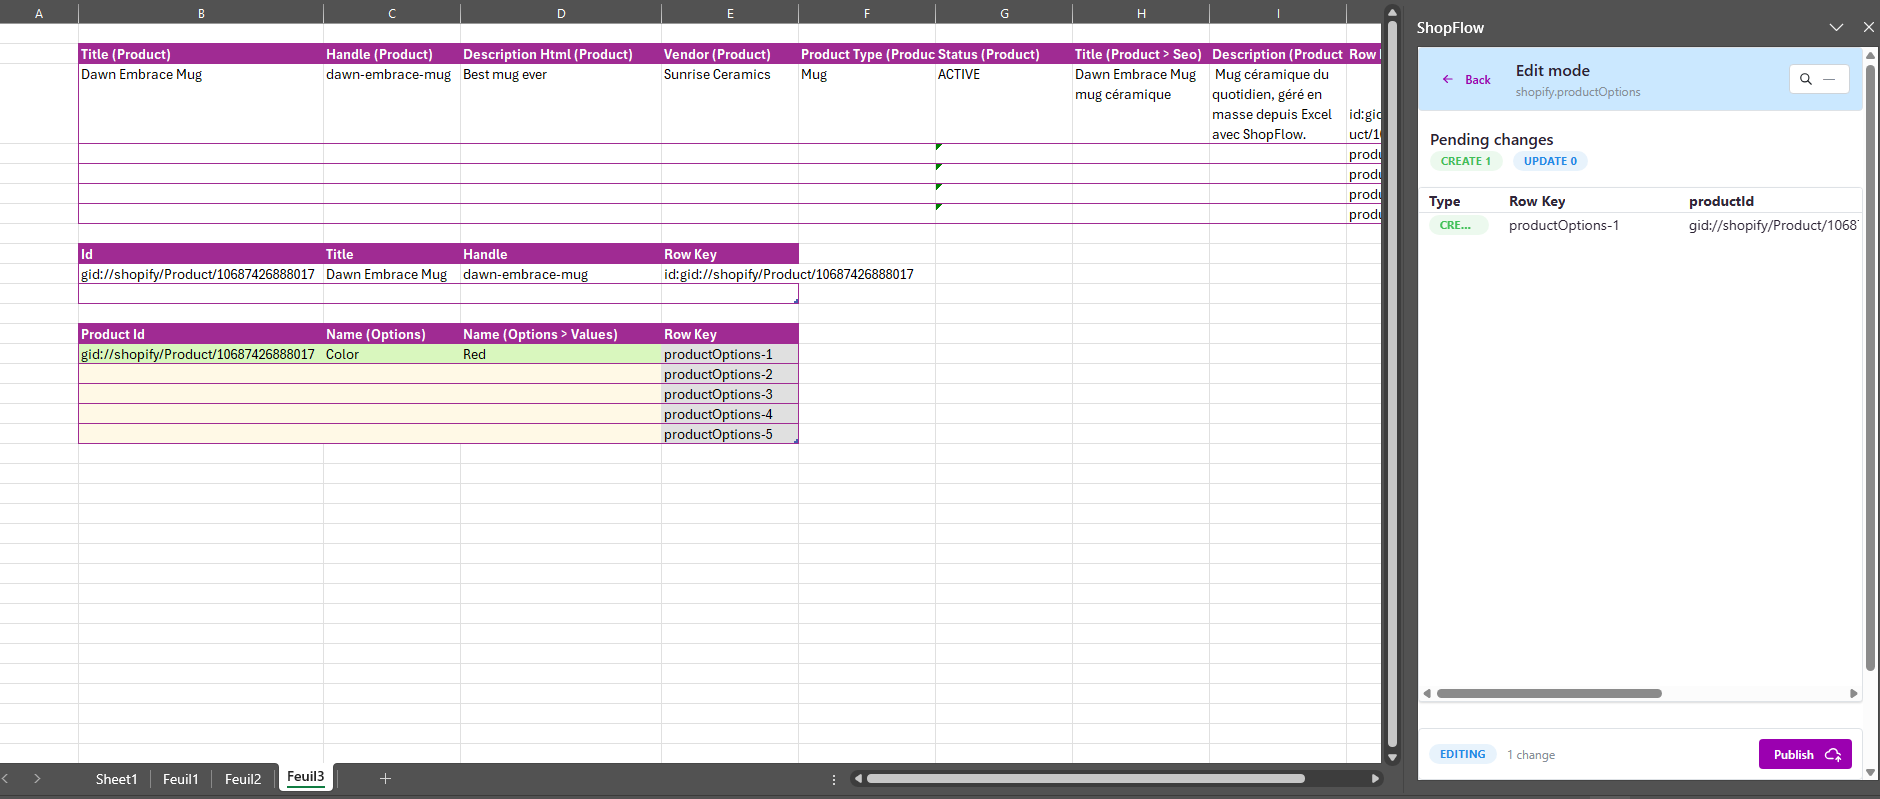
Switch back to Write and select Create Product Option (productOptionsCreate).
In the template, keep only:
Product IdName (Options)Name (Options > Values)
Then click Load.
Recommended way to use this step:
- Create one row per option name that must exist on the product.
- Give each option one starter value.
- Do not try to enumerate every final variant combination here.
Examples:
Product Id: gid://shopify/Product/...
Name (Options): Color
Name (Options > Values): Red
Why only a starter value is enough:
- The real goal of this step is to register the option name on the product.
- In our mug story, this means Shopify now knows that the product varies by
Color. - Once the option exists,
productVariantsBulkCreatecan later attach an existing value by name or create a new value by name. - In practice, you can seed
Redhere, then createGreendirectly during the variants step. - This keeps the
ProductOptionssheet small and avoids duplicate option-name errors.
Practical advice:
- With the default
variantStrategy, Shopify keeps the existing first variant. - In this mug flow, once you seed
Color = Red, treatRedas the variant that already exists. - Do not create the same option name twice for the same product.
- If you already defined
productOptionsdirectly insideproductCreate, you can skip this step.
Click Publish.
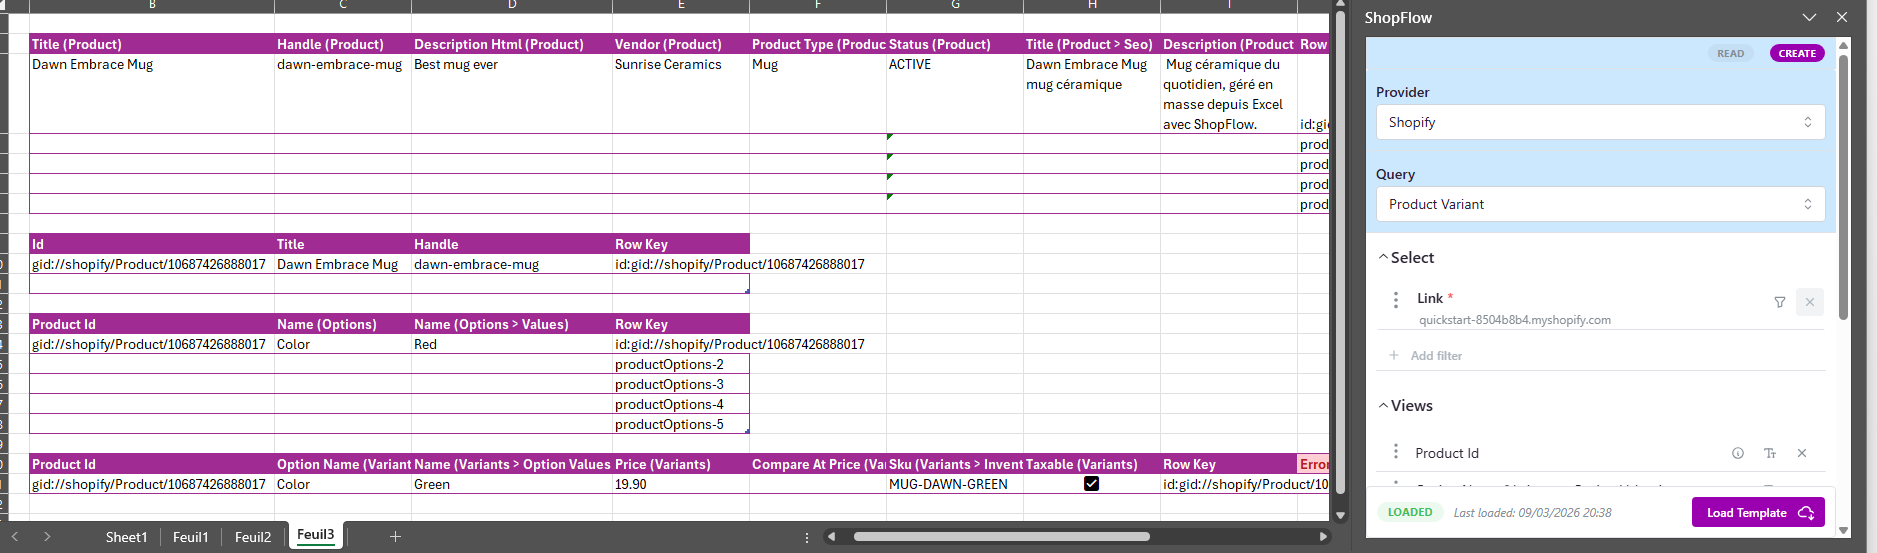
Step 6 Build and fill the ProductVariants template
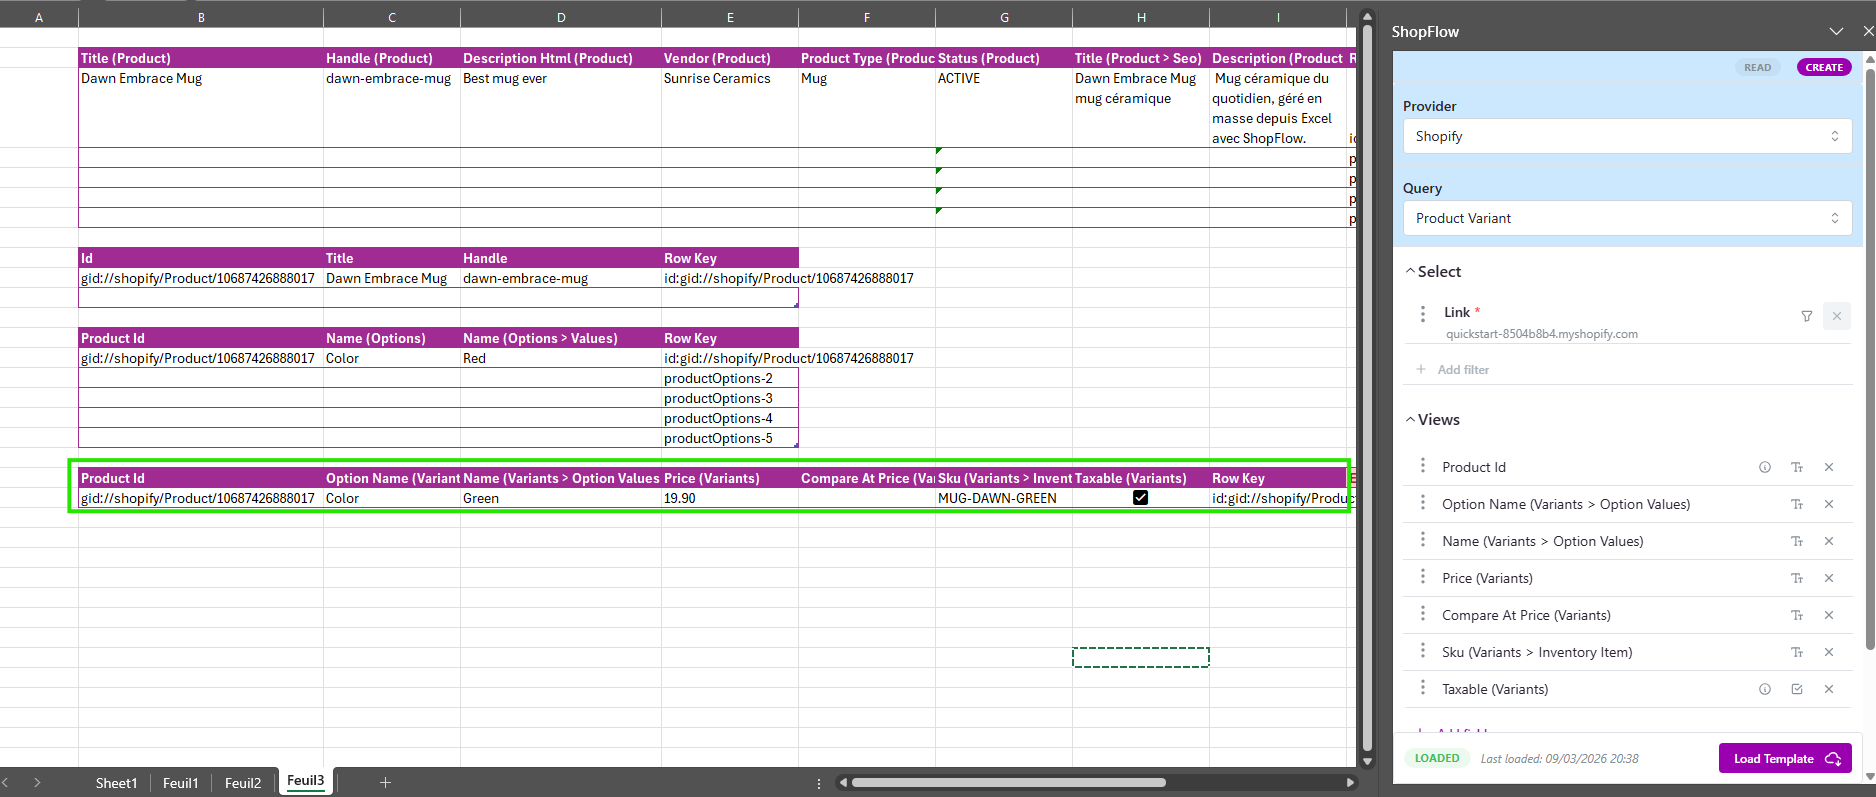
Switch to Write and select Create Product Variant (productVariantsBulkCreate).
Start with:
productIdVariant > Option Values > Option NameVariant > Option Values > NameVariant > PriceVariant > Compare At PriceVariant > Inventory Item > SKUVariant > Taxable
Then click Load.
Rules to follow for each variant row:
- Set
productIdfrom Step 4. - Provide one option value for every option that already exists on the product.
- Add commercial data such as
price, optionalcompareAtPrice, and SKU.
Very important nuance:
- In this guide, the mug product has only one option:
Color. - That means each variant row stays simple: one option name and one option value.
- One row still equals one final variant the customer can buy.
For the mug product in this exact flow, the row to create is:
Product Id: gid://shopify/Product/...
Variant > Option Values > Option Name: Color
Variant > Option Values > Name: Green
Variant > Price: 19.90
Variant > Inventory Item > SKU: MUG-DAWN-GREEN
Another important point:
- You do not have to preload every future option value in
productOptionsCreate. - In our example,
Redis already present after Step 5, andGreenis the variant you create duringproductVariantsBulkCreate. - If the option exists on the product, Shopify can create a new option value during
productVariantsBulkCreatewhen you send it by name. - If you try to create
Redagain here, Shopify returns an error because that variant already exists.
Click Publish.
Step 7 Decide whether to keep or replace the first variant
There are two coherent ways to work after productCreate or after seeding options:
- Keep Shopify's first variant and create only the missing variants afterward.
- Intentionally rebuild the full variant list with
productVariantsBulkCreate.
This distinction matters because Shopify can preserve or remove the standalone first variant depending on the bulk-create strategy.
Practical recommendation for Excel imports:
- In this mug example, Shopify already keeps
Redas the first valid variant, so Step 6 should create only the missing one,Green. - If you want the variants sheet to be the single source of truth, use the appropriate bulk-create strategy and make sure the sheet contains the full final variant list for the mug.
The key point is consistency. Mixing both approaches is what usually creates duplicate or unexpected variants.
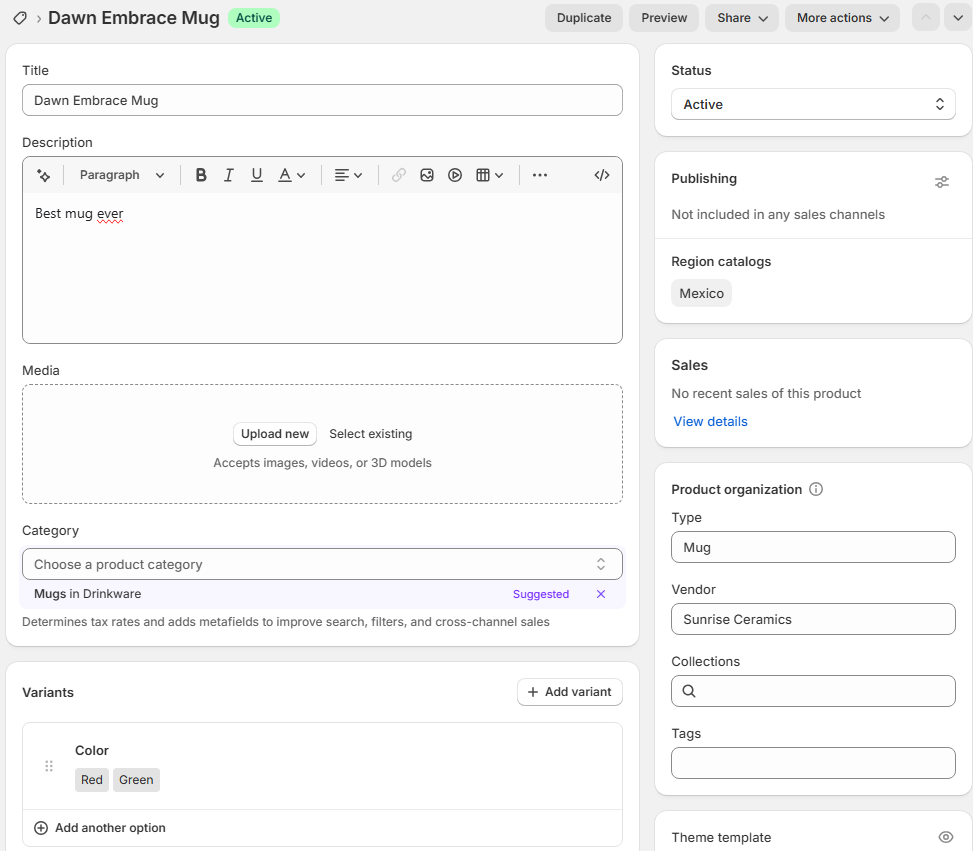
Step 8 Final checks in Shopify admin
In Shopify admin:
- Open Products.
- Search for one of the created products.
- Open the product detail page.
- Confirm option names, variant list, prices, and SKUs.
Also verify:
- The option names on the product are exactly the ones your variants reference.
- The number of variants matches your spreadsheet.
- The first variant was either intentionally kept or intentionally replaced.
If you want the product to be visible to customers, run the publication step for the relevant sales channels after the catalog structure is finished.
There is another way with productSet
Shopify also has productSet, and yes, it can be used to build the same mug in another way.
The difference is the mindset:
- in this article, you create the product step by step
- with
productSet, you think more like a full synchronization of the product state
That approach is powerful, but it deserves its own article because the tradeoffs are different.
In the next blog, we will rebuild the same mug example, still with Red and Green, but this time with productSet so you can see when it is faster, when it is riskier, and why some teams prefer it.
Common errors and fast fixes
-
PRODUCT_DOES_NOT_EXIST:productIdis invalid or belongs to another store.
-
OPTION_VALUES_FOR_NUMBER_OF_UNKNOWN_OPTIONS:- The variant row does not match the option structure on the product.
- Check that every existing option on the product has one value in the variant input.
-
NEED_TO_ADD_OPTION_VALUES:- The product still does not have the required option setup, or the variant input is incomplete.
- Create or seed the missing option first, then retry the variants.
-
duplicate option-name error on
productOptionsCreate:- You are trying to create an option name that already exists on that product.
- Create the option only once, then let variants create or reuse values.
-
duplicate or unexpected first variant:
- You mixed “keep the first variant” and “rebuild all variants” strategies.
- Pick one strategy and make the sheet match it.
-
The variant 'Red' already exists. (variants.0):Redwas already kept as the existing first variant after the option step.- In this flow, send only the missing
Greenrow inproductVariantsBulkCreate.
-
product exists in admin but is not visible on the storefront:
- The write succeeded, but the product was not published to a sales channel.
-
NEGATIVE_PRICE_VALUE:- Price must be greater than or equal to 0.
SEO checklist for a new store
Before considering the import done, validate:
handleis clean, readable, and unique.seo.titleandseo.descriptionare filled for the products that matter most.- Titles, vendors, and product types are consistent across the catalog.
- The variant SKU pattern is consistent enough for support, warehousing, and future updates.
Useful links
- LinkyFlow Shopify connection on Shopify App Store: https://apps.shopify.com/shop-flow
- One-click Shopify connection installation: /docs/shopflow-installation
- Shopify connection page: /products/shopflow
- Shopify
productCreatedocs: https://shopify.dev/docs/api/admin-graphql/latest/mutations/productcreate - Shopify
productOptionsCreatedocs: https://shopify.dev/docs/api/admin-graphql/latest/mutations/productoptionscreate - Shopify
productVariantsBulkCreatedocs: https://shopify.dev/docs/api/admin-graphql/latest/mutations/productVariantsBulkCreate